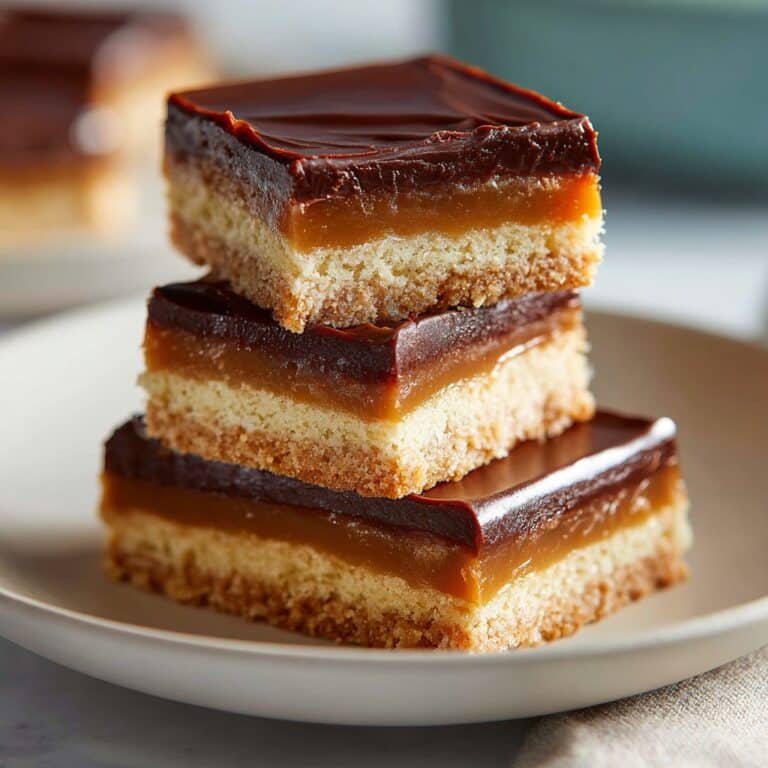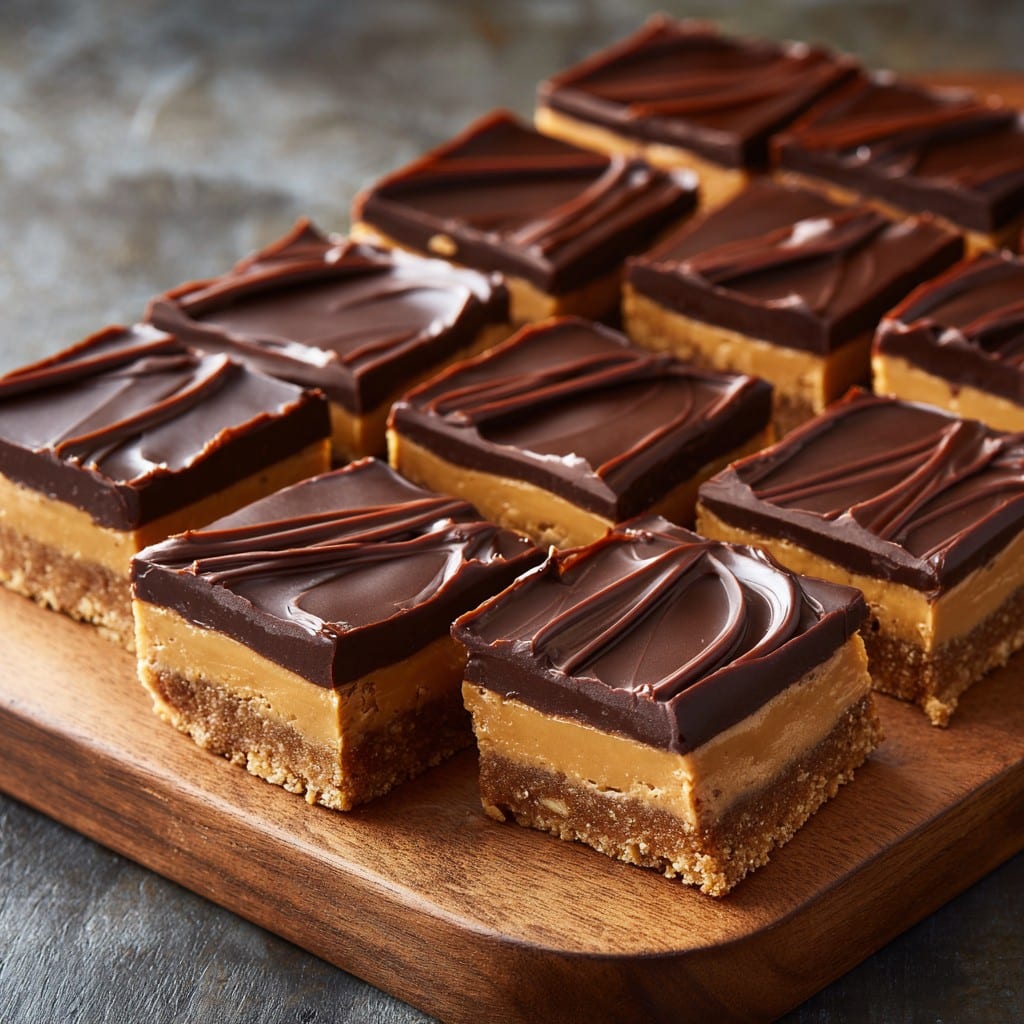
Chocolate Peanut Butter No Bake Bars
Chocolate Peanut Butter No Bake Bars are the ultimate treat for anyone who loves the irresistible combination of chocolate and peanut butter.
This recipe has gained immense popularity in recent years due to its simplicity, rich flavor, and the fact that you do not need an oven to enjoy a delicious homemade dessert.
Originating from the trend of quick, fuss-free desserts, no bake bars have become a staple in many households, especially for busy families or last-minute gatherings. Traditionally, chocolate and peanut butter have been a favorite pairing in the dessert world, with famous confections like peanut butter cups inspiring home bakers everywhere.
Chocolate Peanut Butter No Bake Bars take this classic flavor duo to new heights by layering a sweet, chewy peanut butter base with a decadent chocolate topping, creating a perfect bite every time.
With a prep time of under 20 minutes and minimal equipment required, these bars are as delightful to make as they are to eat.
Whether you are looking for a crowd-pleaser for your next potluck, a lunchbox surprise, or a simple after-dinner dessert, Chocolate Peanut Butter No Bake Bars are a great addition to your recipe collection.
They are perfect for those hot summer days when you want something sweet but don’t want to turn on the oven.
Read on to learn how you can easily whip up a batch of these irresistible no bake bars in your own kitchen, and discover a variety of tips, health benefits, and serving ideas along the way.
Ingredients
- 1 cup unsalted butter, melted
- 1 cup creamy peanut butter
- 2 cups powdered sugar
- 2 cups graham cracker crumbs
- 2 cups semisweet chocolate chips
- 1/4 cup creamy peanut butter (for topping)
- Pinch of sea salt (optional)
Instructions
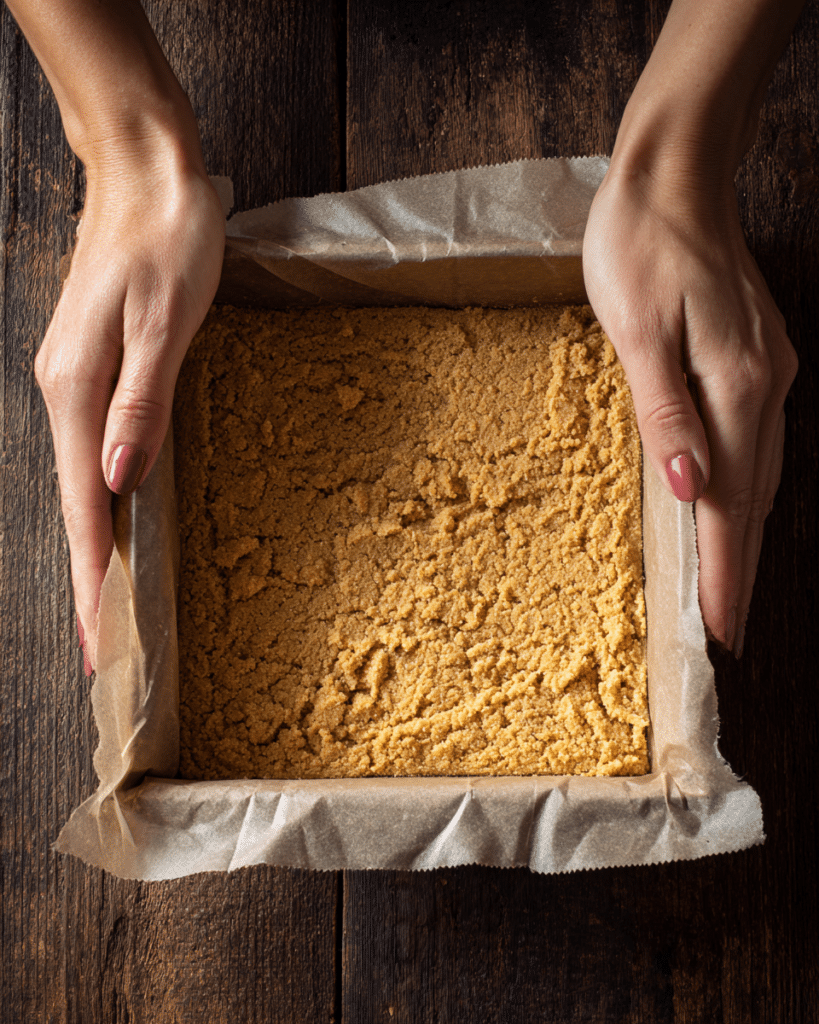
- Line a 9×13-inch baking pan with parchment paper, letting the paper hang over the sides for easy removal later.
- In a large mixing bowl, combine the melted butter, 1 cup of creamy peanut butter, and powdered sugar. Stir until smooth and well combined.
- Add the graham cracker crumbs to the peanut butter mixture. Mix thoroughly until all ingredients are fully incorporated and the mixture is thick and crumbly.
- Press the peanut butter and graham mixture evenly into the bottom of the prepared pan, using a spatula or clean fingers to ensure a compact, flat layer.
- In a microwave-safe bowl, combine chocolate chips and the remaining 1/4 cup of peanut butter. Microwave in 20-second intervals, stirring in between, until fully melted and smooth.
- Pour the chocolate mixture over the peanut butter base in the pan. Spread evenly with a spatula to cover the entire surface.
- Optionally, sprinkle a pinch of sea salt over the chocolate layer for added flavor contrast.
- Refrigerate the bars for at least 2 hours, or until the chocolate has set and bars are firm.
- Once set, use the parchment paper to lift the bars from the pan. Place them on a cutting board and slice into squares or bars.
- Store Chocolate Peanut Butter No Bake Bars in an airtight container in the refrigerator for up to one week.

Nutritional Information
Chocolate Peanut Butter No Bake Bars are a delightful treat, but it’s important to enjoy them in moderation. One serving (one bar, assuming 20 bars per pan) typically contains around 250 calories, 16 grams of fat, 25 grams of carbohydrates, and 4 grams of protein.
The majority of the fat content comes from the peanut butter and butter, providing a source of healthy unsaturated fats alongside some saturated fat. The graham cracker crumbs and powdered sugar contribute to the carbohydrate content, delivering both a sweet taste and energy.
Each bar also provides a small amount of fiber from the graham crackers and protein from the peanut butter. While rich in calories, these bars offer a satisfying balance of macronutrients for a dessert.
For those looking to reduce calories or sugar, consider using natural peanut butter or sugar substitutes, and choose dark chocolate chips with higher cocoa content, which add antioxidants.
Be aware that these bars also contain sodium, primarily from the butter and peanut butter, so if you are watching your salt intake, opt for unsalted or low-sodium versions of these ingredients.
Overall, Chocolate Peanut Butter No Bake Bars can fit into a balanced diet when enjoyed as an occasional indulgence.
Wine and Beverage Pairings
Chocolate Peanut Butter No Bake Bars pair exceptionally well with cold milk, which helps complement the rich chocolate and creamy peanut butter layers. For a more sophisticated option, consider enjoying these bars with a cup of hot coffee or espresso to balance the dessert’s sweetness.
For adults, a light dessert wine such as a tawny port or a sweet sherry provides a lovely contrast to the peanut butter’s saltiness and the chocolate’s bitterness.
If you prefer non-alcoholic options, try serving these bars with a chilled glass of almond or oat milk, which enhances the nutty undertones in the dessert. Iced coffee, chocolate milk, or even a mild black tea are excellent choices as well, offering a refreshing balance to each delectable bite.
Cooking Tips and Variations
To achieve the perfect Chocolate Peanut Butter No Bake Bars every time, keep these tips in mind: Use high-quality chocolate chips for a smoother, richer chocolate layer. If you prefer a less sweet dessert, choose natural peanut butter and reduce the amount of powdered sugar by 1/4 cup.
For added texture, mix in chopped peanuts or rice cereal into the peanut butter base. When pressing the base into the pan, use the back of a spoon or an offset spatula for a compact and even layer to support the chocolate topping.
If you want extra flair, drizzle some melted white chocolate on top after the bars have set. For a gluten-free version, substitute gluten-free graham cracker crumbs. Trying different nut butters like almond or cashew can create exciting new flavors.
To make cutting easier, dip your knife in hot water and wipe it clean between slices. Store the bars in the refrigerator in an airtight container to prevent them from becoming too soft or sticky at room temperature.
Finally, if you are short on time, freeze the bars for 30 minutes instead of chilling for two hours, then serve directly from the freezer for a cool treat.
Serving Suggestions
Serving Chocolate Peanut Butter No Bake Bars can be as simple or creative as you’d like. For casual family snacks, cut the bars into 2-inch squares and serve directly from the fridge on a decorative plate.
When preparing for parties or potlucks, consider cutting the bars into bite-sized pieces for easy sharing and portion control. Garnish each bar with a sprinkle of sea salt, crushed peanuts, or a drizzle of white chocolate for an elegant presentation.
For a dessert platter, pair the bars with fresh berries, mini cookies, or pretzels to create a sweet and salty contrast.
If you’re serving these bars as part of a dessert buffet, stack them neatly in alternating layers with parchment paper between them to prevent sticking and ensure they look appealing. Individual cupcake liners can also be used to present each bar, adding a polished touch to your dessert tray.
For special occasions, serve the bars with a scoop of vanilla or chocolate ice cream for a decadent treat. Regardless of the setting, always keep Chocolate Peanut Butter No Bake Bars refrigerated until ready to serve for best texture and flavor.

Health Benefits
While Chocolate Peanut Butter No Bake Bars are an indulgence, they can offer some nutritional benefits if made with wholesome ingredients and consumed in moderation. Peanut butter contains healthy fats, plant-based protein, vitamins E and B6, and magnesium, contributing to heart health and muscle function.
Dark chocolate, when used, provides antioxidants known as flavonoids, which promote better cardiovascular health and may reduce inflammation. Using natural peanut butter without added sugar or hydrogenated oils can minimize unhealthy fats and added sugars. Choosing higher-cocoa chocolate chips reduces sugar content and increases antioxidant levels.
For a healthier version, substitute some powdered sugar with stevia or monk fruit, and incorporate ground oats for extra fiber. Keep in mind, though, that these bars are energy dense, so portion control is key to avoid excess calorie intake.
People with nut allergies or those who follow a low-sugar diet should modify the recipe as needed. Incorporating Chocolate Peanut Butter No Bake Bars into a balanced diet—enjoyed thoughtfully alongside plenty of fresh fruits, vegetables, and whole grains—can satisfy cravings without compromising overall wellness.
Frequently Asked Questions
Yes, crunchy peanut butter can be used instead of creamy for added texture and a nutty bite. The flavor will remain delicious, and the base will have more crunch.
When stored in an airtight container in the refrigerator, these bars stay fresh for up to one week. For longer storage, freeze for up to two months.
Absolutely! Simply substitute regular graham cracker crumbs with gluten-free graham crackers or similar gluten-free biscuits.
Yes, refrigeration is crucial for setting the chocolate layer and maintaining the bars’ structure. They are best enjoyed cold or at room temperature after chilling.
Certainly. You can use milk chocolate, dark chocolate, or even white chocolate chips, depending on your preference. Dark chocolate will yield a richer flavor.
Chocolate Peanut Butter No Bake Bars are a timeless dessert that marries the beloved flavors of chocolate and peanut butter in a simple, no-fuss recipe. With no need for baking, minimal preparation, and endless possibilities for personalization, it’s no wonder these bars are a favorite for many. Whether making them for a holiday, a party, or just a sweet craving, you’ll appreciate how quickly and easily they come together. Enjoy these bars chilled for maximum flavor and best texture, and feel free to experiment with different toppings and mix-ins. Remember to store any extras in the fridge for ongoing snacking joy. Bring joy to your kitchen and satisfy any sweet tooth with these delectable Chocolate Peanut Butter No Bake Bars.
Ingredients
- 1 cup creamy peanut butter
- 1/2 cup unsalted butter, melted
- 2 cups powdered sugar
- 1 1/2 cups graham cracker crumbs
- 1 1/2 cups semisweet chocolate chips
- 1/4 cup peanut butter (for chocolate layer)
- 1/2 teaspoon vanilla extract
- Pinch of salt
Instructions
-
1Line an 8×8-inch baking pan with parchment paper for easy removal.
-
2In a large bowl, mix together 1 cup peanut butter, melted butter, powdered sugar, graham cracker crumbs, vanilla extract, and salt until well combined.
-
3Spread the peanut butter mixture evenly into the prepared baking pan, pressing down firmly to create an even layer.
-
4In a microwave-safe bowl, melt chocolate chips with 1/4 cup peanut butter in 30-second intervals, stirring until smooth.
-
5Pour and spread the melted chocolate over the peanut butter base. Smooth the top with a spatula.
-
6Chill in the refrigerator for at least 2 hours, then slice into bars and serve.
Approximate Information for One Serving
Nutrition Disclaimers
Number of total servings shown is approximate. Actual number of servings will depend on your preferred portion sizes.
Nutritional values shown are general guidelines and reflect information for 1 serving using the ingredients listed, not including any optional ingredients. Actual macros may vary slightly depending on specific brands and types of ingredients used.
To determine the weight of one serving, prepare the recipe as instructed. Weigh the finished recipe, then divide the weight of the finished recipe (not including the weight of the container the food is in) by the desired number of servings. Result will be the weight of one serving.
Did you make this recipe?
Please consider Pinning it!!